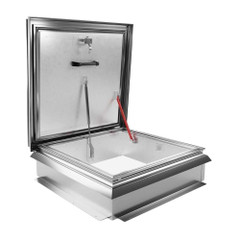
Getting a construction crew and materials onto a roof can be a real headache. Whether it’s a shaky ladder or an impractical lift, difficult access wastes time, jeopardises safety, and slows the operation.
This common struggle highlights a truth in the construction industry. That poor roof access costs money and puts teams at unnecessary risk. For roofing contractors, the job begins with safe, efficient rooftop entry.
That’s why mastering roof access hatch installation is important. It’s a strategic investment in a business’s safety, efficiency, and long-term success.
This guide covers everything you need to know about installing roof access hatches, highlighting smooth operations and simplifying future maintenance.
Key Factors To Consider Before Installing a Roof Access Hatch
Before creating an entry point for any roof access hatch, proper planning is key. Consider taking the following steps first:
Check Building Codes and Regulations
Always check local building codes, fire codes, and HSE requirements on roof access. Depending on the building type, you might also need to consider the Equality Act for compliance accessibility requirements.
Ignoring these can lead to costly fines, project delays, or even safety incidents.
Examine the Structural Integrity of the Existing Roof
Can the current framing support the weight of the hatch, its cover, and the increased foot traffic it will facilitate? If not, reinforce the roof structure for stability and safety.
Also, consider the roof type and pitch. Different roofing membranes—such asTPO, PVC, built-up roofs, or modified bitumen—require specific flashing and sealing techniques. Using the right technique ensures a watertight installation.
Regarding water runoff around the hatch, a flat roof will have different considerations than a low-slope roof. For instance, flat roofs drain more slowly, while low-slope roofs shed water better. Consider this so that the hatch properly integrates with the drainage plane.
Pick the Right Location
Where you place a roof access hatch is just as important as how to install it. Strategic positioning improves accessibility, efficiency, and safety.
For instance, will the hatch be used daily for routine maintenance, occasionally for equipment access, or for rare emergencies? This will influence location and other factors such as size, material, and opening mechanisms.
To optimise workflow and access, choose a location that minimises travel distance for personnel and materials.
Additionally, the new hatch should not obstruct future construction additionslike new rooftop equipment, solar panel arrays, or additional HVAC systems.
Ensure Safety All-Around
Position the hatch away from obvious hazards like vulnerable HVAC units or too close to parapet edges. It should be easily accessible from a safe interior ladder or stair access point.
Selecting the Ideal Size and Material for A Roof Access Hatch
The right size and material for a roof access hatch are vital for long-term performance and functionality. Consider standard dimensions first, as these are often more readily available and cost-effective.
However, don’t hesitate to opt for custom sizes if the project demands it—especially in cases involvingunique architectural requirements or oversized equipment.
All in all, always check that there’s enough headroom and manoeuvrability for personnel and tools to pass through.
As far as materials go, here are some common factors to consider:
- Durability and Strength: Steel is a popular option as it offers superior durability and robustness. It’s preferred for high-security areas or heavy-duty use. Galvanised or stainless steel options are known to provide enhanced protection. Aluminium is also popular due to its lightweight nature and excellent corrosion resistance.
- Insulation: A well-insulated hatch contributes to the building’s energy efficiency and temperature control. It does so by preventing heat loss or gain.
- Finish and Aesthetics: The roof hatch’s finish should align with the building’s aesthetics. Some hatches have a powder coating that blends seamlessly with the building’s exterior, giving it a sleek finish.
- Opening Mechanisms: Manual hatches are cost-effective but require more effort. Assisted lift models, on the other hand, use gas springs for easier opening and closing. Electric operators provide maximum convenience for frequent access or very large hatches. They can often be integrated with building management systems for added control.
Tips To Ensure Durability, Weather Resistance, and Longevity
The success of any roof installation project depends on the precision of the installation process. Follow these tips to ensure that any roof access hatch stands the test of time.
- Pre-installation Checks: Verify that the rough opening dimensions are precise and that the surrounding area is level.
- Manufacturer’s Guide: Follow the manufacturer’s instructions for flashing and sealing to achieve watertight seals with appropriate sealants and gaskets.
- Anchoring and Fastening: Use the right type and spacing of fasteners to fasten the hatch to the structural framing for stability and safety.
- Ladder/Stair Integration: It should be smooth so there’s a safe and secure transition from the interior access point to the hatch opening.
Optimise Workflow With Strategic Roof Access Hatch Installation
Investing in a properly installed roof access hatch offers significant long-term benefits for roofing contractors. It provides enhanced safety and increased efficiency. It also saves time and labour costs for future inspections, routine maintenance, and emergency repairs.
With strategic installation, you can ensure compliance with safety and building codes, avoiding potential liabilities. By prioritising thoughtful planning, proper planning, material selection, and installation techniques, you set the stage for smoother operations.


