


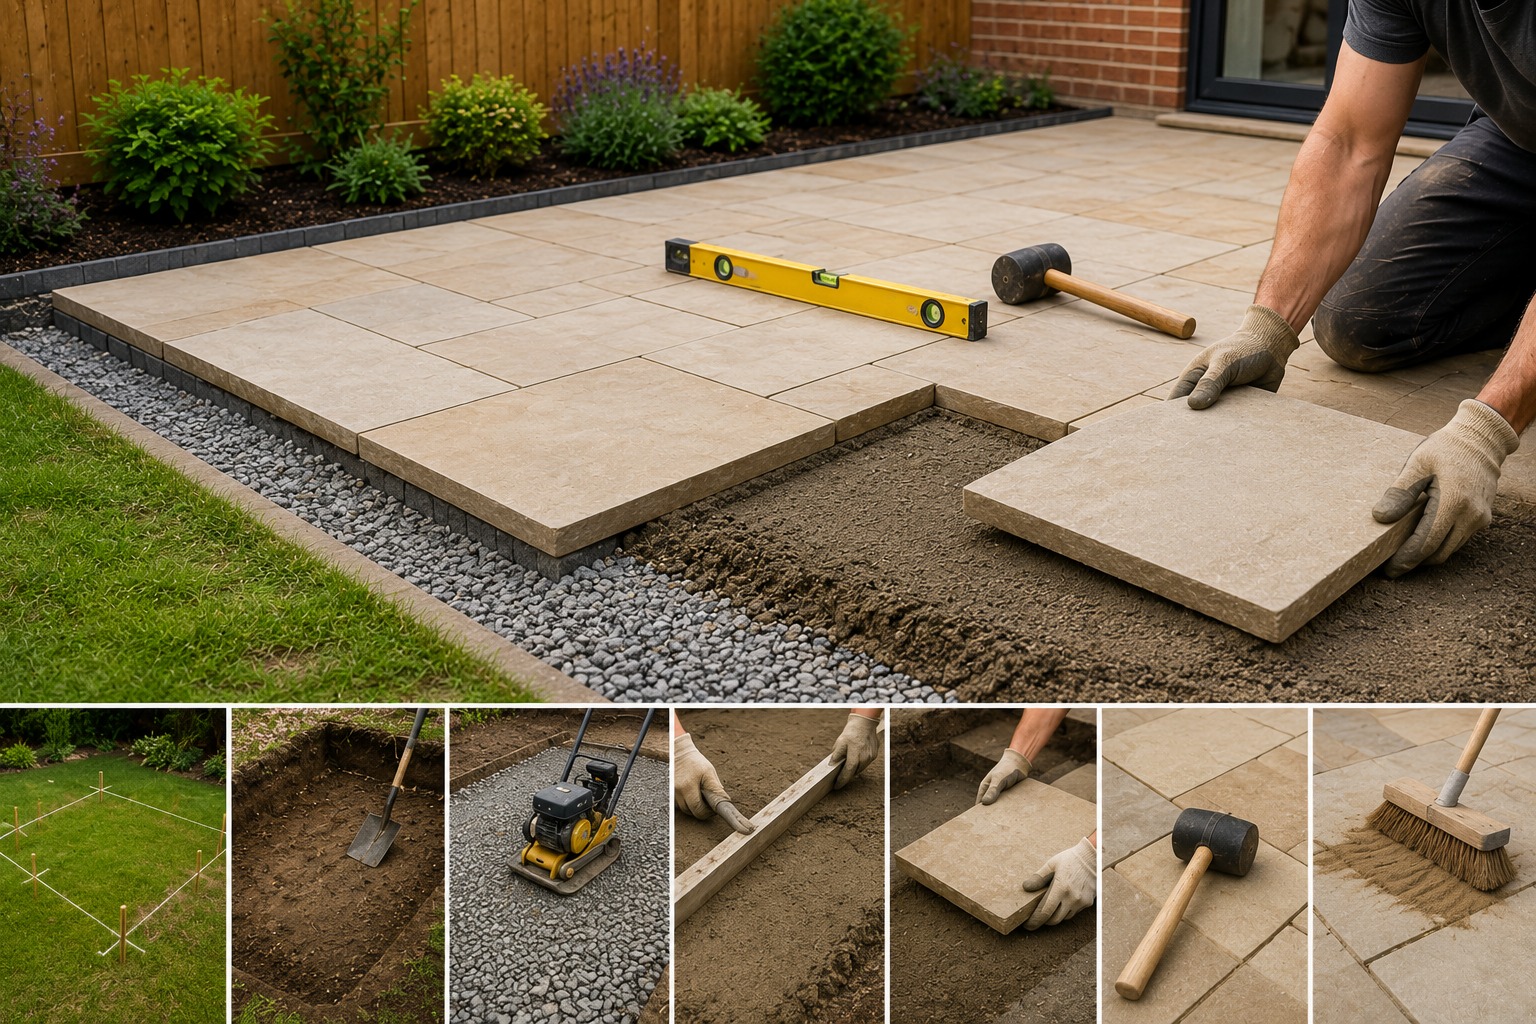
Learning how to lay a patio is one of those DIY jobs that looks straightforward from the finished photographs. The paving is flat, the joints are neat and everything appears to sit naturally in the garden. Most of the hard work, however, is hidden underneath. A patio that stays level through wet winters and dry summers depends far more on the preparation below the slabs than on the final few taps with a rubber mallet.
That does not mean a beginner cannot do it. A small, square or rectangular patio on reasonably level ground is a realistic project for a confident DIYer who is prepared to measure carefully, hire the right compaction equipment and avoid rushing the base. The key is to work in stages and check levels continually rather than trying to correct mistakes once several slabs are already down.
This guide takes you through the whole process, from marking out and excavation to the sub-base, mortar bed, paving, jointing and curing. It also covers drainage, quantities, common mistakes and the point at which bringing in a professional may save more money than it costs.
Quick Answer: How Do You Lay a Patio?
For a typical garden patio, mark out the area, excavate enough depth for the paving build-up, compact a stable MOT Type 1 sub-base, establish a gentle fall away from the house, then bed each slab on a full layer of mortar. Check every slab for level and alignment as you work, allow the bedding to set, then fill the joints and keep traffic off the surface while it cures.
A common domestic build-up is around 100mm of well-compacted sub-base beneath roughly 30-40mm of mortar, although the exact specification should suit the paving product, ground conditions and manufacturer guidance. The finished paving should also remain safely below the damp-proof course of the house.
Before choosing the exact position and size, it is worth thinking about how the finished space will actually be used. PAD Magazine’s guide to designing outdoor areas you’ll actually use is a useful starting point for planning seating, circulation and the relationship between the patio and the rest of the garden.
Tools and Materials You Will Need
Having everything on site before you mix mortar makes the job much calmer. Once laying begins, repeated trips to a builders’ merchant can leave half-finished bedding drying while you are away.
Basic tools
- Tape measure, string line and sturdy pegs
- Spade, shovel and rake
- Wheelbarrow
- Long spirit level and straightedge
- Rubber mallet
- Brick or pointing trowel
- Plate compactor (usually worth hiring)
- Mixing tray, wheelbarrow or cement mixer
- Stiff brush and sponge for cleaning
- Paving cutter or angle grinder with a suitable diamond blade if cuts are required
- Gloves, eye protection, hearing protection and a suitable dust mask for cutting
Main materials
- Paving slabs
- MOT Type 1 or another specified sub-base aggregate
- Sharp sand and cement for the bedding mortar
- Jointing material suitable for the paving
- Priming slurry where required, particularly for many natural stone and porcelain products
- Edging or restraint material if the patio design needs it
Step 1: Plan the Patio Before You Dig
Start with the finished patio, not the hole in the ground. Mark the intended footprint using pegs and string, then place garden furniture inside the outline. This simple test often reveals that a patio which looked generous on paper feels tight once a table, chairs and walking space are added.
Think about where water will go, where doors open, whether the patio will meet lawn or borders, and how many cut slabs the pattern is likely to create. A simple rectangular layout is easier for a first project than a shape with several curves or narrow returns.
If the patio is part of a wider garden update, PAD’s article on how to make a garden look professionally designed explains why structure and repetition usually matter more than adding lots of separate features.
Step 2: Set the Finished Level and Drainage Fall
This is the stage that is easiest to underestimate. A patio can look perfectly flat to the eye and still need a slight fall so rainwater does not sit against the house or collect in shallow puddles.
For many conventional patio installations, a fall of roughly 1:60 is used as a practical guide – about 17mm of drop for every metre. The fall should lead water towards a suitable drainage area rather than towards the building or a neighbour’s property. The exact approach may need to change on awkward sites, very large areas or where drainage is already poor.
Use a taut string line to represent the intended finished paving level. Check that the surface will remain at least around 150mm below the property’s damp-proof course where it meets the house. Door thresholds, air bricks, drains and inspection covers also need to be considered before excavation starts.
Step 3: Excavate the Area
Remove turf, topsoil, roots and soft material until you reach firm ground. For a typical domestic patio, the total excavation often works out at roughly 150-200mm, but the correct depth depends on the slab thickness, bedding layer, sub-base and existing ground level.
Do not assume the ground is equally firm across the whole area. A former flower bed, old trench or recently disturbed patch may need extra excavation and compacted fill. If one section remains soft underfoot while the rest is solid, deal with it now rather than hoping the paving will bridge over it.
Step 4: Lay and Compact the Patio Sub-Base
The sub-base is what spreads the load and gives the paving a stable platform. Around 100mm of compacted MOT Type 1 is commonly used for a domestic patio on suitable ground. If the excavation is deep, place the material in layers rather than dumping the full depth at once.
Compact each layer thoroughly with a plate compactor. The surface should feel solid and should not visibly move underfoot. Keep checking the intended fall while you work; the sub-base should broadly follow the same drainage direction as the finished paving rather than being perfectly level underneath a sloping surface.
Typical Patio Build-Up for a Domestic Garden
| Layer | Typical Depth | Purpose |
| Paving slab | Varies by product | Finished walking surface |
| Full mortar bed | About 30-40mm | Supports and bonds the slab |
| Compacted MOT Type 1 | About 100mm | Stable load-bearing sub-base |
| Prepared ground | As required | Firm foundation below the construction |
These figures are a useful starting point rather than a universal specification. Heavy-use areas, weak ground, different paving systems and product-specific installation requirements can change the build-up.
Material choice also affects installation details and long-term maintenance. PAD’s guide to patio design and materials for a northern climate is useful if you are comparing porcelain, natural stone and other surfaces for wetter or frost-prone parts of the UK.
Step 5: Mix a Workable Mortar Bed
A full mortar bed gives each slab continuous support. Avoid placing slabs on a few isolated blobs of mortar; gaps underneath can leave unsupported areas and make future movement or cracking more likely.
A common bedding mix is around four parts sharp sand to one part cement, with enough water to make the mortar workable but not wet and sloppy. The mix should hold together when squeezed. Work in manageable batches, especially on warm or windy days, so you are not trying to use mortar that has already started to stiffen.
Some paving products need the back of the slab primed before it is laid. This is particularly important with many porcelain and natural stone systems. Follow the paving manufacturer’s instructions rather than assuming every slab can be installed in exactly the same way.
Step 6: Lay the First Paving Slabs
Choose a straight, visible edge as your starting point. Spread enough mortar for one slab at a time, creating a full bed at roughly the required depth. Lower the slab into position rather than sliding it through the mortar, then tap it gently with a rubber mallet.
Check three things immediately: the individual slab is supported, its surface follows the overall fall, and its edges line up with the string line and neighbouring slabs. A long spirit level laid across more than one slab helps you spot small high or low points before they become a pattern across the whole patio.
Keep joint widths consistent. The right gap depends on the paving type and manufacturer’s recommendation, but traditional paving often uses a visible joint rather than slabs being pushed tightly together.
Step 7: Make Cuts Carefully
Plan cuts before reaching the final edge. A narrow sliver of paving beside a wall is awkward to cut, easy to break and rarely looks intentional. Small adjustments to the starting line can often produce wider, cleaner edge pieces.
If you use an angle grinder or powered saw, cutting dust is a serious consideration. Work outdoors, use the correct blade and protective equipment, and follow the tool and paving manufacturer’s safety instructions. If you are not comfortable using cutting equipment, paying for cuts or hiring a professional for this part of the job is sensible.
Step 8: Let the Paving Bed Set
Once the slabs are in place, resist the temptation to start furnishing the patio. Give the bedding time to set and keep unnecessary foot traffic off the surface. Weather, temperature, mortar type and product instructions all affect curing, so the manufacturer’s guidance should take priority over a fixed timetable.
As a practical rule, many traditional installations are left at least 24 hours before light foot traffic or jointing, and longer in cool or wet conditions. Protect fresh work from heavy rain or frost where possible.
Step 9: Fill the Joints
Jointing is not simply cosmetic. Properly filled joints help keep the finished surface tidy and reduce movement at slab edges. Traditional sand-and-cement pointing, brush-in compounds and resin-based jointing products all have different preparation and moisture requirements.
Whatever system you use, clean the face of the paving as you go. Cement residue and some jointing compounds can stain porous stone if they are left on the surface. Test unfamiliar products on an offcut or inconspicuous area first.
Step 10: Final Checks Before You Use the Patio
- Walk the perimeter and make sure edge slabs are properly restrained.
- Check that surface water runs in the intended direction.
- Look for rocking slabs before furniture hides them.
- Remove mortar or jointing residue while it can still be cleaned safely.
- Allow the installation to cure fully before placing heavy planters, barbecues or furniture in position.
Common Patio-Laying Mistakes to Avoid
Skipping proper compaction
A sub-base that looks flat but has not been compacted properly can settle later. This is one of the reasons patios develop dips, rocking slabs and uneven joints after the first winter.
Trying to make the top surface perfectly level
A patio needs drainage. “Level” should not mean water has nowhere to go. Establish the fall before laying the first slab and keep checking it.
Using spot bedding
A few mortar dabs can leave hollow areas below the paving. A full bed gives more consistent support and is the safer approach for conventional patio slabs.
Mixing too much mortar at once
Beginners usually work more slowly than experienced landscapers. Smaller batches give you time to adjust slabs without racing against mortar that is already going off.
Ignoring the product instructions
Porcelain, sandstone and concrete are not interchangeable. Primer requirements, joint widths, cleaning methods and acceptable jointing products can differ significantly.
It is also worth reading PAD’s piece on garden jobs you should think twice about doing yourself. Patio laying is included because poor levels and badly supported slabs can create both expensive repairs and trip hazards.
How Much Material Do You Need?
Measure the patio length and width in metres and multiply them to get the area in square metres. For a rectangular 4m by 3m patio, for example, the area is 12m².
Order a little more paving than the exact measured area to allow for cuts, breakages and future replacements. The sensible allowance depends on the laying pattern: a simple grid produces less waste than a diagonal design or an area with several corners.
| Item | How to Estimate | Practical Note |
| Paving | Patio area + waste allowance | Keep spare slabs from the same batch if possible |
| Sub-base | Area × compacted depth | Loose aggregate reduces as it is compacted |
| Mortar | Area × bedding depth | Mix in manageable batches |
| Jointing | Depends on slab size, depth and joint width | Use the product coverage calculator |
For a broader view of budgeting, including the less obvious costs around an outdoor project, see PAD’s guide on how to budget for your dream outdoor space.
Does the Method Change for Porcelain, Sandstone or Concrete?
The overall sequence – stable base, drainage, bedding, accurate laying and jointing – stays broadly similar, but the details can change with the paving material.
- Porcelain paving often needs a suitable priming slurry on the back because the slab absorbs very little moisture.
- Natural stone may vary in thickness and can need more adjustment in the mortar bed to keep the finished surface even.
- Concrete paving is often more consistent in thickness but can still stain if mortar is left on the face.
- Large-format slabs are heavy and awkward to position; lifting equipment or a second person may be needed.
Always check the installation sheet supplied with the exact paving you buy. General DIY advice is useful for understanding the process, but the manufacturer’s specification should decide the final method.
Do You Need Planning Permission for a Patio?
For a straightforward rear garden patio at a house, planning permission is not normally the main obstacle, but there are exceptions and drainage still matters. Rules can differ for flats, listed buildings, conservation areas and projects that alter levels or affect other protected features.
Front gardens need particular care. UK government guidance explains that in England, paving more than 5m² of a front garden with an impermeable surface can require planning permission unless rainwater is directed to a permeable area or an appropriate permeable system is used. Check the GOV.UK guidance on permeable surfacing of front gardens and your local planning authority if you are unsure.
When Is It Better to Hire a Professional?
DIY makes most sense when the site is simple: a modest patio, straightforward access, relatively level ground and a paving pattern with limited cutting. The balance changes when the project involves retaining walls, significant level changes, complicated drainage, very large or expensive slabs, poor ground or difficult access for excavation.
If the materials are costly, the labour saving from DIY can disappear quickly if several slabs are damaged or the whole patio needs relaying. You can also split the job: do the planning and excavation yourself, then pay a landscaper for the technical laying stage.
PAD has also reported that pavers are among the most searched-for home professionals in the UK, which is a useful reminder that many homeowners choose professional installation even when they initially research the DIY route.
What to Do Once the Patio Is Finished
Give the hard landscaping a little breathing room before filling every corner. A table, a few chairs and one or two substantial planters usually look better than lots of small objects scattered across a new surface. Leave clear walking routes and keep drainage points accessible.
If you want weather protection without enclosing the space, PAD’s covered pergola ideas for UK gardens can help you plan the next stage without undoing the simplicity of the patio itself.
Frequently Asked Questions
How deep should a patio base be?
A common domestic arrangement is around 100mm of compacted MOT Type 1 beneath a full mortar bed, but total excavation must also allow for the paving thickness and finished levels. Ground conditions and the paving manufacturer’s specification can require a different build-up.
Can you lay paving slabs straight onto soil?
For a permanent patio, laying slabs directly onto soil is not a good approach. Soil moves, holds moisture and can settle unevenly. A properly prepared and compacted sub-base gives the paving a much more stable foundation.
What mortar mix is used for patio slabs?
A commonly used bedding mix is around four parts sharp sand to one part cement with enough water to make a workable, firm mortar. Always check the paving manufacturer’s instructions, especially for porcelain or natural stone.
How much fall should a patio have?
A gentle fall of roughly 1:60 is widely used as a practical guide for conventional paving. That is about 17mm of drop per metre. The important point is that water is directed safely away from the building and not trapped on the surface.
How long should you leave a new patio before walking on it?
Many traditional mortar-bed installations are left for at least 24 hours before light foot traffic, with longer curing in cold or wet weather. Follow the bedding and jointing product instructions because curing times vary.
Can a beginner lay a patio?
Yes, if the area is small and straightforward and the person is comfortable with measuring, excavation, compaction and handling heavy slabs. Complicated drainage, large-format paving or significant changes in level are better suited to an experienced installer.
Do you need a membrane under a patio?
A membrane is not a substitute for a well-compacted sub-base. Whether a geotextile layer is useful depends on the ground conditions and the chosen construction system, so it should not be treated as an automatic requirement for every patio.
Final Thoughts
The best way to learn how to lay a patio is to stop thinking of it as a slab-laying job. It is really a ground-preparation and level-control job with paving at the end. If the excavation is sound, the sub-base is compacted properly and the drainage fall is established before the first slab goes down, the visible part of the project becomes much easier.
Take your time with the first few slabs, keep checking lines and levels, and do not be afraid to stop for the day rather than rush a batch of mortar. A patio is expected to stay in place for years; spending another hour on the base is a far better trade than spending a weekend lifting it again later.

